Fantasy vs. Reality: Building a Shelter
 By Fabian Ommar
Being exposed to the elements automatically turns humans into survivors, whether in the wilderness or in the city. Unlike most animals, we aren’t naturally equipped to handle bad, extreme, or changing weather efficiently, nor to remain duly concealed/protected from predators and other threats. That’s why knowing how to build a shelter in a variety of environments is so important.
I’m not talking just about rain, sun, heat and cold, people or wild animals: even insects and bugs can foist absolute hell upon us. Outdoors, we are at risk and invariably suffer. Perishing becomes just a matter of time, depending on the fluidity of conditions.
Our gear and resources can also get lost or degrade rather quickly if not protected: food spoil, drinks get contaminated, stuff damaged, carried (or taken) away, and so on. Therefore, being properly sheltered is perhaps one of the most critical and defining situations in a person’s life. It’s certainly so during emergencies and evasions.
Building shelter is an essential skill.
Shelter is one of the “basics” of survival and must be a priority. Everyone talks about bugging out, leaving to the woods, or being on the road, but without the “how,” this is just fantasy. And shelter is a big part of that “how.”
People living in regions of extreme conditions or areas prone to natural disasters must give this even more importance. Especially if an emergency evacuation is in the plans (and it should). As a skill, it can help improve our situation at home, too, in case heating or power goes off (creating micro-climates), or if the roof gets damaged by a storm, for instance.
Wandering the streets and observing the homeless (and living like one) is survival training, I learned a few ways people improvise shelter in the urban environment. I’ve also practiced outdoor activities for most of my life, and most techniques come from the military and outdoor activities such as mountaineering, camping, backpacking, etc.
I strive to keep learning and sharing my experiences. The main lesson is, whatever the circumstances, every prepper should know a few basics about sheltering. There’s no need to go complex or fancy. However, there are many options and variables, so consider this an introduction.
Fantasy versus reality in shelter building
Let’s begin by destroying some myths. When it comes to survival, fantasy can get us injured or killed. Forget about building a fancy lean-to tent in the forest (much less a log cabin). Especially if you’ve never tried it and are trying to evade a disaster or some other danger. It can be done, sure – but is not nearly as easy as seen in movies and time-lapse videos.
Beyond the multiple skills needed to properly handle the materials and tools, it can be intensively energy-and-time consuming, and those are two vital resources. It’s not without risks, like cuts, poisoning, insect bites, animal attacks. Stay with what works. There are plenty of functional options available. Even wrapping yourself with some plastic and cardboard or using a poncho can be effective.
Shelter building in the wilderness
First is finding the best spot, and that doesn’t mean a killer view of lush vegetation. Physical characteristics play a key role in picking an adequate spot to pitch a tent or tarp, hang a hammock, or stake a bivvy. Be pragmatic: protection and safety are the priorities. It’s not camping, forget about comfort.
It takes some time and experience to properly find, scan, and evaluate the best site to build or improvise a shelter. It’s not rocket science, but we do learn a few lessons the hard way, which often include waking up wet and cold in the middle of the night during a storm or watching our gear float in a mud puddle or get washed away. Or robbed.
A few things to pay attention to: terrain inclination/formation, vegetation, accessibility. Scan the surface: is it grass, rocks, sand, mud? Does it nest insects, spiders, other animals? Check uphill for rocks, accumulated snow, debris. Analyze exposure, proximity with a water source, concealment. Look around and think of all things that could go wrong if the conditions change.
Off-Grid Survival Toolkit (Ad)
Another aspect to take into consideration is safety. This includes a lot of variables, so it’s hard to go into detail. Overall, try and be aware of other people, animals, natural hazards (falling trees, poisonous plants, rocks, flooding lands, fires, lightning, insects, etc.).
Specifically, when it comes to being safe from others, secluded and isolated places may look like the best option (for instance, during an emergency or lawlessness). But “in the woods,” we’re on our own. No bushcraft skills? Find a middle ground and take measures to be as concealed as possible, stay vigilant, and be prepared to defend if necessary.
Shelter building in the city
As I say in my street survival training book, it’s much easier to find shelter in the city than in the wilderness. Towns are a “collective” of shelters: lots of structures can serve that purpose. But again, it’s just not there for us to simply access or use. It can be tricky and have consequences. But some items, tips, and concepts from the wilderness can be applied in the city as well.
It’s common nowadays that homeless are using camping tents. Some sleep in a city or NGA shelters. And old trick: cardboard boxes are plentiful and free and offer decent insulation from the cold and wind, though not from water and insects. Old carpet tiles, discarded blankets, plastic coverings, and various recyclables are also widely used to improvise protection. All stuff that can be added to your shelter, too.
Building overhangs, empty parking lots, and other more-or-less protected recesses at abandoned or for-rent commercial places are “natural barrier” makeshifts. Some homeless sleep under bus stop covers. Others build more-or-less “fixed” cabins out of used wood boards, plastic, or other material to get some longer-term shelter from the weather.
Be extremely careful when looking for a place such as abandoned buildings and houses. Some places might be already “taken.” Even decent homeless will be wary and defensive when it comes to their turf, especially if they have families around. There might be addicts or even criminals hiding, and this presents an obvious danger.
It took time for me to get comfortable and feel safe sleeping in the streets. I’ve tried many strategies, and admittedly I wasn’t really safe: unless we’re concealed in a place sheltered from elements, we’re not really protected from threats, pests, or the elements. But we do get used after some time and develop tricks to improve the situation.
General considerations for choosing a shelter type and strategy
Before opting for this or that type, a few things must be considered. Study the weather, terrain, and vegetation in your region. If the plan includes bugging out, do the same for your path. Choose the equipment weather rating accordingly. Take into account the needs and limitations of individuals and the group. Is it going to be a single overnight or a multi-day trip?
Portability is another important yardstick: weight and bulk must be considered. Ease of use, too: the best piece of equipment is the one you can carry with you and doesn’t require too much time, specific knowledge, or bodybuilder’s muscles to deploy. Each has its pros and cons.
Most shelters will require extras for better protection, improved comfort, and/or increased insulation from elements. Think rain and snow, wind, drafts, insects, the ground, etc. The most common extras are bug nets, insulating mats, groundsheets, and sleeping bags. These can be used in various forms for most types of shelter presented below.
Finally, during an evasion, setting up camp in or around villages or towns along the way means staying closer to resources and support, but safety may be an issue depending on the situation. Being in the woods without proper knowledge and specific skills can be even more dangerous, as said before. The best strategy should be decided based on the overall context and personal situation.
(For more information on emergency evacuations, make sure you check out our free QUICKSTART Guide on the topic.)
The most common options for shelter-on-the-go
I’ve used all of these in a great variety of conditions. This is a primer. There’s just too much information and possibilities. I left off the extras (sleeping bags, etc.), but I go into more detail about some of these and lots of other emergency gear in my book on how to build EDCs and emergency (and bug out) bags, available here from The Organic Prepper Learning Center.
Tents
Tents have evolved a lot in the past few decades. They come in all shapes and sizes and use lightweight, durable, water, and weather-proof materials throughout, they are easy to assemble and take down. I’ve switched hammock and tarp and bivvy tents years ago and never came back, but I’ve slept many times in parks, under bridges, and pass ways using my old tent.

Tents are great for beginners and those planning to drive cars during evasions. Some models are extremely compact and lightweight, the top ones weighing ounces and made of super high-tech materials. Most people will be fine with consumer-friendly models. One or two-person tents usually offer the best weight-size-price ratio.
Pros of tents: ease of use, decent protection, and privacy. They’re also roomier, more so than bivys, which can be quite claustrophobic and warm. Bag and gear can go inside, which is a huge plus in any situation. They’re also freestanding, requiring just a few anchoring points, a groundsheet, a mat (XPE or other) for ground insulation, and a modicum of comfort.
Cons of tents are bulk and weight (esp. 3+ person capacity), lots of parts (more lose or break), difficult to clean and dry and assemble/disassemble time. Water and dirt can (and do) get in, no matter how careful we are. Tents also require groundsheets and some insulation otherwise. They can be very uncomfortably to lay or sleep.
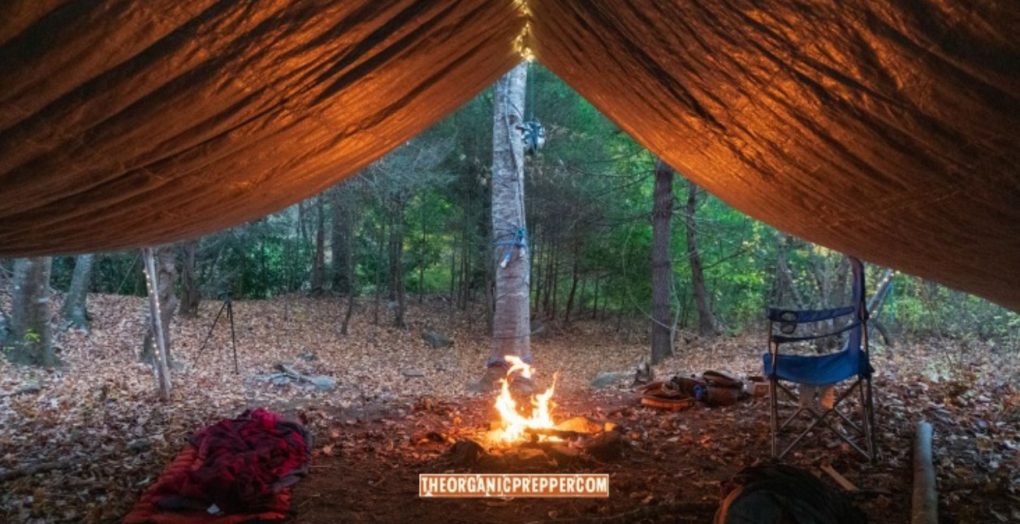
Tarps and ponchos
The tarp is the simplest, most straightforward shelter for any occasion. It can be improvised in many forms, almost anywhere, with little and common stuff. Just tie a piece of plastic, fabric, or canvas to trees, stones, stakes, or other anchoring points, and you have a roof. That’s enough to protect some from rain, dew, and snow.
A poncho can do the same and be pitched as a tarp (or serve as ground cloth). As always, there’s a lot more to it. If not properly assembled or improvised with flimsy materials, you can find yourself and your stuff unprotected when most needed. Wind can rip it or blow rain sideways… in short, a lot can go wrong, and it’s usually in the worse times. Believe me, I know it.
To avoid that, opt for a decent tarp (or poncho) made from ripstop fabric such as nylon or polypropylene (a.k.a. SilNylon and SilPoly when treated with silicon/TPU for increased waterproofness). These are relatively lightweight, compact, inexpensive, and can be repaired. Eyelets and timeouts add robustness and facilitate installation, which is usually made with stakes of some kind, and guylines (cords).
Keeping it taut helps with wind, water, and snow. Lower equals less wind/more protection; higher means more ventilation and room. Knowing a few knots (trickier) or using cord locks of various kinds (easier) is required to pitch a tarp decently and swiftly. As for size, a 6.5’x9’ is good for one person and gear. A 10’x10’ flat (square) tarp is the standard and allows for multiple pitches (the traditional “A” frame is easiest and can shelter two or more).
There are literally hundreds of options of all kinds, sizes, and colors available at online stores, for as little as a few dozen bucks or as much as over a hundred. Opt for discreet colors. No need to go overboard with this. It’s just a tarp. Check if it’s best to have one for everyone, or each individual in your family/group should have their own tarp.
Bivvy
The term comes from bivouac, or temporary open-camp. One person, bivvy-style sacks and tents are common in the military and UL backpacking but serve well for survival due to simplicity and versatility. Sacks are basically waterproof “body bags”: they add heat and protect from splash and wind, but a tarp is required to stave off precipitation.
Bivvy tents are roomier and more versatile but heavier and bulkier. As with other items on this list, there are hundreds of options available, from cottage to industrial. Look for weatherproofing, also weight, and size. Be sure to pick one with mesh uppers: bivvys can get really hot really fast, so breathability and ventilation can be an issue, especially in warmer climates.
The low profile can be camouflaged into the vegetation, a huge plus in dangerous areas and situations. This also helps with shedding wind, a bonus when it’s cold. Must be careful when choosing the site, though, or it can get flooded if it rains. And always use a groundsheet (Tyvek, Polycro, heavy-duty trash bag, etc.).
Hammock
One of the main advantages of hammocks is being suspended. No need to find an appropriate (i.e., relatively clean, dry, and flat) spot to lay a tent or bivvy – though it requires stout and spaced-out trees or other structures to hang. We stay away from crawlies but remain vulnerable to flying insects.
Other advantages are low weight, packability, simplicity, and comfort (if you know how to hang it: there are rules and good practices). Some models have integrated bug netting. Others require separate mesh enclosures or “socks.” Or, just have some good repellent with you (which you should, anyway).
Hammocks also require extras like suspenders and straps, a tarp (regardless of weather – you should always consider an overhead), an insulating mat, or under quilt to protect from cold drafts, splash, and even insect biting through the fabric. Yes, even during summer: the temperature drops significantly in the woods at night, and wind can rob body heat fast.
Emergency shelters
Mylar tents and bivvy sacks are a staple of emergency response and preparedness. These are lightweight, efficient (reflect 90%+ of body heat), can be waterproof, protect from the sun and heat, are compact and inexpensive. But most are not durable and won’t make for a middle- (much less long-) term emergency shelter.
Mylar is also noisy, which is bad if we don’t want to draw attention and monitor the surroundings at the same time. If you want others to see you (i.e. rescuers), opt for a high-vis color: orange is the standard. Some brands offer the traditional dark olive or even camouflage print.
Some tents are two-person, others accommodate only one inside. Triangle-tube tents are easy to set up, require minimal cordage and skills, and are highly effective to protect the top and bottom. Consider using these if your emergency plan requires provisional shelter for only a few nights, and weight and bulk are an issue.
Vehicles
Lots of people camp and live in cars, trucks, buses, trailers, RVs. I did thorough research on “living in a car” for my book and came up with some really interesting findings. Anyway, this is much more common in developed places, and this is related to safety reasons.
In countries or areas with high levels of criminality, it can be a risky proposition. I’d say thanks to Thirdworldization and all the crap that’s been hitting the fan even in the most unsuspected nations, it’s bound to become reasonably common but at the same time unsafe in most places.
Final thoughts on shelter building
Whatever type of emergency shelter you opt for, practice. Unpack, familiarize yourself with the parts, read the instructions, watch videos. Test in your apartment, backyard, a park. Better yet, go camping, backpacking, trekking.
This should be the rule for each and every piece of emergency equipment and procedure, if possible, in various conditions. Even the simplest solutions and strategies can fail, in the worse time, and certainly if we’ve got a lot in our hands and minds to deal with.
Get good at it before you need to.
What kind of shelters do you prefer?
Have you practiced building shelters? What kind of shelters do you tend to favor? Have you found some that just don’t work? Let’s discuss it in the comments.
Source: The Organic Prepper
Fabian Ommar is a 50-year-old middle-class worker living in São Paulo, Brazil. Far from being the super-tactical or highly trained military survivor type, he is the average joe who since his youth has been involved with self-reliance and outdoor activities and the practical side of balancing life between a big city and rural/wilderness settings. Since the 2008 world economic crisis, he has been training and helping others in his area to become better prepared for the “constant, slow-burning SHTF” of living in a 3rd world country.
Fabian’s ebook, Street Survivalism: A Practical Training Guide To Life In The City, is a practical training method for common city dwellers based on the lifestyle of the homeless (real-life survivors) to be more psychologically, mentally, and physically prepared to deal with the harsh reality of the streets during normal or difficult times.
You can follow Fabian on Instagram @stoicsurvivor